#couturecreationsaus #imaginariumdesigns

Welcome to Day 3 of the
Couture Creations & Imaginarium Designs Blog Hop!
We’re so excited to team up with Couture Creations sharing inspiring projects created with both our products with you this week. What could be more perfect than Embossing Folders and Dies and Imaginarium Designs gorgeous Chipboard designs.
Each day this week we will feature our Design Team projects and over on the Couture Creations Blog they will also feature their Design Team projects all created using Couture Creations and Imaginarium Designs products. So loads of inspiring projects for you to help get your creative juices flowing.
Each day this week we will feature our Design Team projects and over on the Couture Creations Blog they will also feature their Design Team projects all created using Couture Creations and Imaginarium Designs products. So loads of inspiring projects for you to help get your creative juices flowing.
We will link to the tutorials on each Design Team members blogs,
please show all our designers some love and leave a comment on their blog.
please show all our designers some love and leave a comment on their blog.
We’ll be giving away Two $100 prize packages filled with Couture Creations & Imaginarium Designs goodness at the end of the week, so be sure to play along and check back on both Imaginarium Designs and Couture Creations blogs Monday 4th August 2014 to see if you’re the lucky winner!
Here are the different ways you can play along with us –
Like Couture Creations on Facebook.
Like Imaginarium Designs on Facebook.
Follow both the Imaginarium Designs and Couture Creations Blogs.
Share today's Imaginarium Designs blog post on your Facebook wall and tell them you did on our Facebook page.
Leave a comment on today's blog post on the Imaginarium Designs blog post and on their Facebook page.
Follow Couture Creations on Pinterest.
Follow Couture Creations on Instagram.
Hop over to the Couture Creations Blog and see what their Design Team has created using their Chipboard and Couture Creations products!
They also have a giveaway, so what are you waiting for – hop over!
Oh, and don't forget to follow our Design Team Blogs!
They also have a giveaway, so what are you waiting for – hop over!
Oh, and don't forget to follow our Design Team Blogs!
~~~~~~~~~~~~~~~
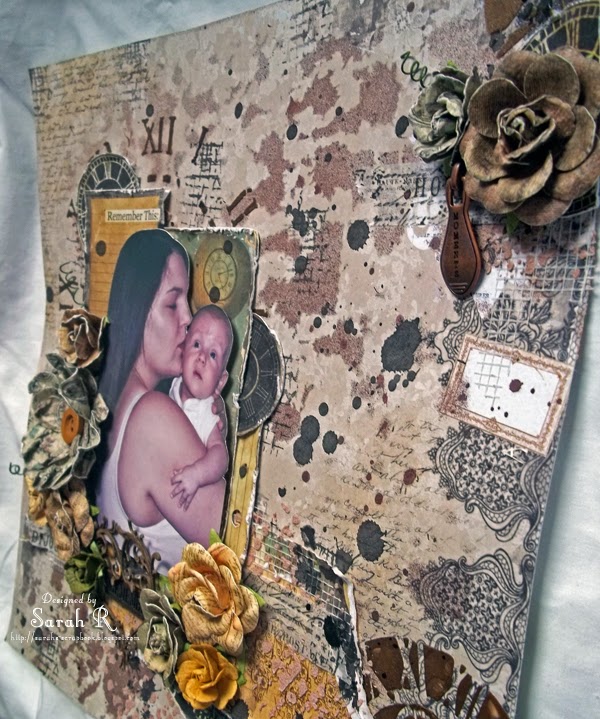
Here is my project for the Blog Hop!
Here is my project for the Blog Hop!

I was inspired by the organic feel of the pattern in the Couture Creations embossing folder to create an "earthy" mixed media tag! This tag was so fun and easy to create with the Imaginarium Designs Chipboards and Couture Creations Die and Embossing Folder - here is a quick step by step:
- Emboss a piece of paper slightly larger than your tag base with the Couture Creations Embossing Folder - I have used the Large Peacock Fans Folder from "The Marriot Collection". Glue the embossed paper to your tag base and trim around the edges and punch the hole.
- Gently ink the surface of the embossed tag - this will really bring out the embossing - also ink the edges. I've used Distress Ink in Vintage Photo.
- If you wish, add some more detail with a mask and 3D paint - I've used the Mini Leaf Frame 6x6 template from The Crafter's Workshop with Art Anthology Velvet Dimensional Paint in Basil.
- Cut three small frames using the Couture Creations Elegant Square die from "The Van Roe Collection". Layer the three frames using 3D foam adhesive. The layered frames become the centerpiece of the tag. I added flowers, fussy cut butterflies and a large square brad inside and around the frame as embellishments.
- Now for your chipboard elements - mist two of the Imaginarium Designs Art Deco Embellishments - I've used Art Anthology Colorations Spray in Mocha. Paint the Imaginarium Designs Word "grow" (I've used the same paint as I used for the masking), then add Ranger Crackle Accents to the word.
- Add the chipboard embellishments to the tag, layering the title on top of one of the Art Deco flourishes. I've also added a brad to the centre of each of the Art Deco Embellishments - they frame the brads perfectly!
- As a final step, if you want to - splatter your tag with a few drops of the same mist you used on your chipboards.
Here are some close-ups of the tag!


~~~~~~~~~~~~~~~
Be sure to stop by the other Imaginarium Designs DT Blogs today: Evgenia Sokolinskaya and Romy Veul.
Don't forget to share the love!
~~~~~~~~~~~~~~~
Imaginarium Designs Chipboard Used
Denise's Art Deco Embellishment 1 - Tiny
IDDD0010
IDDD0010

love, grow, hello
IDW0083

Couture Creations Products Used
Embossing Folder - The Marriot Collection
Large Peacock Fans
CO723668
Large Peacock Fans
CO723668

Elegant Square
CO723724
CO723724

Other Products Used
Patterned Paper - FabScraps Fantasy Flight C65 005; Art Anthology Velvet Dimensional Paint - Basil; Art Anthology Colorations Spray - Mocha; Distress Ink - Vintage Photo; Ranger Crackle Accents; The Crafter's Workshop Balzer Designs 6 x 6 Template - Mini Leaf Frame; Farmhouse Paper Company Norland Buttons, Brads & Metals; Prima Flowers - Time Traveler's Memories Collection; Burlap Ribbon.