Tuesday, December 22, 2015

Vintage Santa ATCs

I created this set of ATCs for the November/December ATC exchange at Scraps of Darkness/Scraps of Elegance! I found out today that my exchange partner, Jenny, got them - so now I can share some photos/details about them!

My craft room is currently dis-assembled for redecorating, so I had to use some papers that I had handy - so I used the American Crafts Jack Frost 6x6 papers and some Vintage Santa images from Meg's Garden for the ATCs. I went with a wintery theme and stenciled on some Liquitex Opaque Flakes texture paste and poured Finnabair glitter over the wet paste for some extra shimmer. I made a wreath with some berry vine from my stash and punched out greenery from three different shades of green paper. I added some flowers from Wild Orchid Crafts and some winter berries from my stash and then finished the ATCs off with the 'snow' made from heavy gesso sprinkled with glitter. Here is a photo of the set and some close-ups of each ATC.


I really hope Jenny liked her ATC set! Happy Christmas!

Tuesday, December 15, 2015

Creative Embellishments Design Team!

I'm so excited to announce that I am joining the Creative Embellishments Design Team starting January 1, 2016. Check out the Design Team announcement here!
Pop back on January 1, 2016 to see my first design team project with the fantastic Creative Embellishments products!

Saturday, December 12, 2015

Victorian Pillow Box Shaker Ornaments and a Tutorial ~ for Meg's Garden!

Hi Crafty friends! Sarah here to share a set of four Pillow Box Shaker Ornaments I created using the absolutely divine Meg's Garden Vintage Christmas Papercrafter Pack! I've put together a video slideshow tutorial showing how to create one of these easy but beautiful ornaments - I hope you'll give it a try.

Here are a couple of photos from different angles of the set of ornaments - aren't the papers just gorgeous?! And I love those vintage Santa images. I embellished with some flowers and winter berries from my stash and added some heavy gesso and fairy dust as 'snow' to the embellishments and "Noel" cut-out!


And here is the full step-by-step slideshow tutorial!

Video Slideshow Tutorial


Thanks for stopping by my blog today! Happy Crafting!

Meg's Garden Products Used:
Vintage Christmas Papercrafter Pack

Sunday, November 1, 2015

An Eerie Tale Stacked Coffins and Mini Album - Part 2

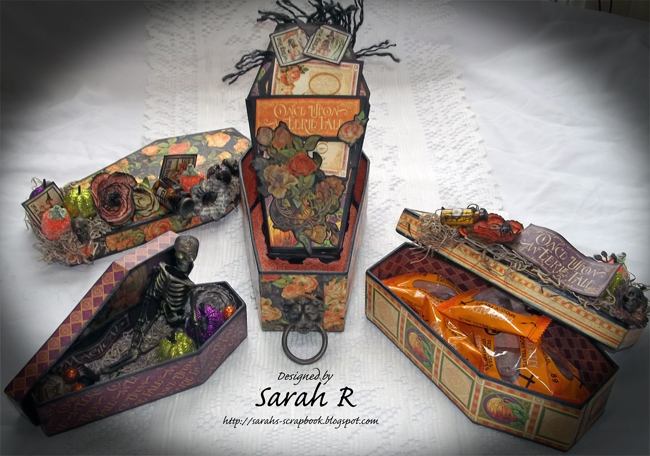
Hi Crafty Friends! I'm back with Part 2 of my post of my Graphic 45 An Eerie Tale Stacked Coffins and Mini Album.  In this post, I'll share lots of photos and details of the coffin-shaped mini album that fits in the largest coffin box. And I must tip my hat to Anne Rostad, whose mini-albums and tutorials have been such an inspiration.

This album is an accordian fold album, so I was able to decorate both sides of the pages. I used both the 12x12 papers and the 6x6 paper pad to create this album. I've created lots of pockets and tags and added in a few magnets to hold things in place. I've used lots of fussy-cuts throughout the album and only glued down the outside edges of the fussy-cut elements (in most cases) so that I could tuck tags and things in behind them. All the papers are edged with Distress Ink in Black Soot. *Learning experience - if you ink your fussy cuts before using matte medium to adhere them to cardstock (to add durability/thickness), the distress ink will smear and tint the fussy cuts - I used them anyway in this case since its a Halloween album and the dark-tinted fussy-cuts sort of work in a spooky album.

I provide lots more details for each page in each of the sections below! Enjoy!

Front & Back Covers
The front and back covers are both have the same design - a belly band of the "Once Upon an Eerie Tale" border piece, along with a tag and cut-out tucked in behind the belly band and fussy cutting. I've matted all the tags/cut-outs on black cardstock and then embossed core-dinations papers using Tim Holtz embossing folders, and then sanded and inked the embossed papers to get the dark, distressed look. These will make great photo mats for the album!


 Pages 1 & 2
I created some pockets at the base of these pages and reversed the paper patterns on the opposite pages. I added a belly band to the right page and have tucked in some small tags with fussy-cuts from the 6x6 papers and a larger tag and cut-out from the 12x12 papers.
Pages 3 & 4
"The Beauty" and "The Beast" cut-outs were used to make magnetic flaps that are holding some cut-outs and long tags in place. There is also a small pocket at the bottom of these pages with a couple of extra fussy-cut stamps tucked in them. I thought I woudl use the long "bookmark" tags to mat some 'photo-booth' style photo-strips for these pages!
Pages 5 & 6
This is a simple design with  large pockets to hold the two coffin-shaped tags. The fussy-cut pumpkins are loose on the inside/bottom edges so they can hang over the floral border and have a picture tucked under the pumpkin!
Pages 7 & 8
Here are two more pocket pages similar to Pages 1 & 2, though in this case I created two embossed coffin fold-outs to tuck in the pockets! Lots of fussy cuts inside the fold-out that can hold some photos or journalling! I've already added two small tags that can be used for journalling.
Pages 9 & 10
This was such a fun set of pages to create. The 'pockets' are magnetic and actually fold down to reveal a couple of journalling/photo spots. The two mini tag books are also magnetized to hold them in place. I had lots of fun creating the fussy-cut scene on these pages!
Thanks so much for stopping by my blog - I hope you liked my An Eerie Tale Stacked Coffins and Mini Album!
Happy Scrapping!


Saturday, October 31, 2015

An Eerie Tale Stacked Coffins and Mini Album - Part 1

Hello Crafty Friends and Happy Halloween! Have I mentioned that I LOVE Halloween?!?! This year I've been working on a big project with the Graphic 45 An Eerie Tale collection. I used three coffin nesting boxes and stacked them to create this altered art piece. The boxes are magnetized so that they'll stay together when stacked. The top box is a decorative piece, the middle box can hold some Halloween Candy and the bottom box holds the An Eerie Tale mini-album, which I am going to use for Halloween pictures of my son. In this post I'm going to share some photos and details of the stacked coffins. I'll share the mini-album with you in my next post!
 I started off by painting the kraft-coloured coffins with black gesso. I cut papers to fit the insides and outsides of the boxes and used mod-podge (matte) to adhere all the papers. The magnets that hold the stacked boxes together were glued to the boxes before adding the paper so that they're hidden. I've inked all the papers and fussy cuts with Distress Ink in Black Soot and embellished the stacked coffins with some Spanish moss, painted plastic skeleton, mini-skulls and spiders; inked flowers; frosted/glitter pumpkins; Tim Holtz Apothecary Vials (with black wax sealing the corked lids); and fussy cuts from the An Eerie Tale papers (which I backed on black cardstock).

Here are some close-ups and different angles of the stacked coffins!


And a couple of shots of the un-Stacked Coffins!


Join me again tomorrow for Part 2 of this post in which I'll share a look inside the Coffin Mini Album!
Have a Spooky Halloween!

Friday, October 23, 2015

Upcycled Christmas to Spooky Halloween Village

I have a super fun project to share with you today! I bought a small ceramic Christmas Village for $6 at a local second-hand store and have upcycled it to a Spooky Halloween Village. I LOVE Halloween - its so fun and stress-free and this Halloween Village will be an awesome decoration for years to come! My son LOVES it SO much that when we saw another second-hand Christmas Village the other day, he asked me to get it to make more houses for the Halloween Village (I'm still working on these new pieces)! Here's a Before/After Shot of the Village pieces (sorry the before is a little blurry).
I used lots of Finnabair mediums on this, including Heavy Black Gesso, Heavy White Gesso, Soft Matte Gel Medium and Ebony Glitter. I've also used some acrylic paints in metallic purple and metallic green, as well as some orange sparkle paint. I finished off the houses with some "graveyard moss", foam pumpkins and some painted plastic spiders and mini-skulls. More details and close-ups below!
I started off by painting each of the pieces with a coat of black gesso. Once that had dried, I dry-brushed the pieces with white gesso. I highlighted details on each piece using orange, purple, green, white, and red acrylic paints and added ebony glitter to the roofs using Soft Matte Gel. The Soft Matte Gel was also the best way to apply the graveyard moss. Finally, I added the pumpkins, spiders and skulls using Beacon 3-in-1 glue. Here is a close-up of each piece!
Morgue  (Formerly a Firehouse!)

Haunted House

Deconsecrated Church

Fence and Body Snatchers

Bridge and Headless Horseman

Vampire Carriage
Spooky Halloween Village - with Lights
I hope you had fun seeing my Spooky Halloween Village - I can't wait to add more pieces to it!
Happy Halloween! 

Tuesday, October 20, 2015

A Victorian Christmas Advent Calendar and High Tea at Younique - Nov. 8 and Nov. 15!

Please join me for the first class I'll be teaching at Younique Country Retreat Scrapbooking. This is a class you do not want to miss. You will create a beautiful Advent calendar using Prima's Victorian Christmas papers and flowers and a House of Drawers from KaiserCraft. This will be a keepsake that will be passed down from generation to generation.

This class will be offered at both the Guelph (November 8) and Mount Forest (November 15) locations. The Class fee of $90 includes all materials, instructions and, of course, what's a Victorian project without a High Tea in the afternoon! Register through the Younique Online Store or call (519) 836-0045.


I hope you'll join us at Younique for a fun afternoon of crafting!

Wednesday, September 30, 2015

"Nana" - for Meg's Garden using the English Rose Garden Collection

Hi Scrappy friends! I have a new layout using the Gorgeous English Rose Garden collection. As soon as I saw these papers, I new I wanted to do a heritage layout using a photo of my grandmother with my sister and me and our children - three generations! I wanted the layout to look almost like a visit to Nana's house - with her favourite colour (green) as well as floral and lace accents.
I've embellished the layout with doilies and lots of flowers, lace and metal accents from Meg's Garden store as well as a few pieces from my stash.  I also added some extra sparkle to the layout using a stencil with white texture paste sprinkled with bronze glitter! Here are some close-ups and different angles of the layout!


Thanks for stopping by my blog today!
Happy Scrapping!

Meg's Garden Products Used:
Meg's Bundle of Goodies - Temptations in Cream, Camel, Copper and Brown
The English Rose Garden Collection - A Bouquet of Roses and Leaves & Foliage
Circle Lace Doilies (15 cm diameter) 

Thursday, September 10, 2015

Mixed Media Vintage/Grungy Cards for Meg's Garden

Hi Scrappy friends! Today, I'm sharing a set of three mixed media, vintage/grungy cards created using the gorgeous Meg's Garden English Rose Garden collection!  I just love the Cut & Create pages included in the Meg's Garden collections - they make it so easy to find a gorgeous image to act as the centerpiece for a card!
I created these cards using the 6x6 papers and bit and pieces of the 12x12 papers from the English Rose Garden Collecton. I also added in some pieces of doily, lace and flowers from the Meg's Garden Store. I used sparkling watercolours, black acrylic paint and white gesso from my stash to add the colour/splatters, as well as some flowers, sentiment tickets and microbeads as embellishments. Here are some close-ups!


Thanks for stopping by my blog today!
Happy Scrapping!

Meg's Garden Products Used:
Meg's Bundle of Goodies - Temptations in Cream, Camel, Copper and Brown
The English Rose Garden Collection - Mini PackA Bouquet of Roses, Roses &Lace and Paisley Roses
Circle Lace Doilies (15 cm diameter)