Today, I have an Art Journal Page inspired by Alice in Wonderland to share with you - created for the Creative Embellishments Design Team! If you follow my blog at all, you'll know that I have a whole series of 'Alice' Art Journal Pages! I created the background using a stencil and Lindy's Stamp Gang Cheshire Cat Cherry Starburst, added the Tim Holtz Tissue Tape and then splattered the page with Curiouser Chartreuse Flat Fabio. Then, I used strongly brewed tea and added splashes, splatters and tea rings to the page. I used Creative Embellishments Clock Hands and Mini Pocket Watches embossed with Ranger Fine Black Embossing Powder to embellish the page and then added pieces of the Creative Embellishments Tea Set to the page. I wanted the Tea Set to look like old china, so I painted it with White Gesso and used the Lindy's Stamp Gang Mists to stain the designs on the chipbooard; finally, I used UTEE to give the Tea Set a nice glossy finish. The clock hands point to the tea cups because - "It's Always Tea Time!"
Here are some close-ups and different angles of the page!
Thanks for stopping by my blog today. I hope you enjoyed another little trip to Wonderland!
I have a fun new project to share with you, including a step-by-step Snapguide tutorial! I've used lots of Creative Embellishments chipboard elements, along with Graphic 45's Voyage Beneath the Sea collection papers and Prima Art Mediums to create this Mixed Media Altered Bottle!
I've used the following Creative Embellishments Chipboard elements on the bottle:
Hi Crafty Friends! Today, I have a project created for the Creative Embellishments Design Team to show you - a dress form I altered using a whole lot of Creative Embellishments Chipboard pieces! I am calling this piece my Clockwork Angel! It was SO fun to make!
FRONT
I started off altering the dress form by gluing on the lace and all the chipboard items. I have used a variety of different sized of CE Gears around the entire dress form. I have also used the Bicycle Chain Borders, a Door Knocker, Clock Hands, and Keys. The winged CE Chipboard is the gorgeous Steampunk Heart with Wings - I added the top of one of the chipboard keys to this to make it look like you could turn the gears in the heart. Once all the chipboard pieces were in place, I added a few Prima metal embellishments and some half pearls and then started painting the dress form with both black and white gesso. I focused the black gesso on the bottom of the dress form and the white gesso on the top, blending them in the middle. Once the gesso dried, I sprayed the entire dress form with Lindy's Stamp Gang Starburst Mist in Steampunk Sepia. Once it was dry again, I started playing with colour using the new Finnabair Art Extravagance Metallique Paints by Prima. And I just KEPT playing with different colours until I was happy with the results. Finally, I added some Finnabair Art Extravagance Antique Silver Crackle Texture Paste in places and finished off the dress form with some Hematite glass beads. Lots more pictures below to show you all the details!
BACK
RIGHT SIDE
LEFT SIDE
CLOSE-UPS
I hope you enjoyed seeing my Clockwork Angel Altered Dress Form - it is on display in my craft room now and I just love it! Happy Crafting!
Prima Marketing Inc. is having their annual Design Team call and this year I am trying out for the opportunity to design with some of the best products in the industry! I've showcased some of my favourite projects within each of Prima's Craft Arenas below... Wish me luck!
Craft Arena 1 - Cards, Tags and Layouts
Love & Family - Mixed Media Photo Tags
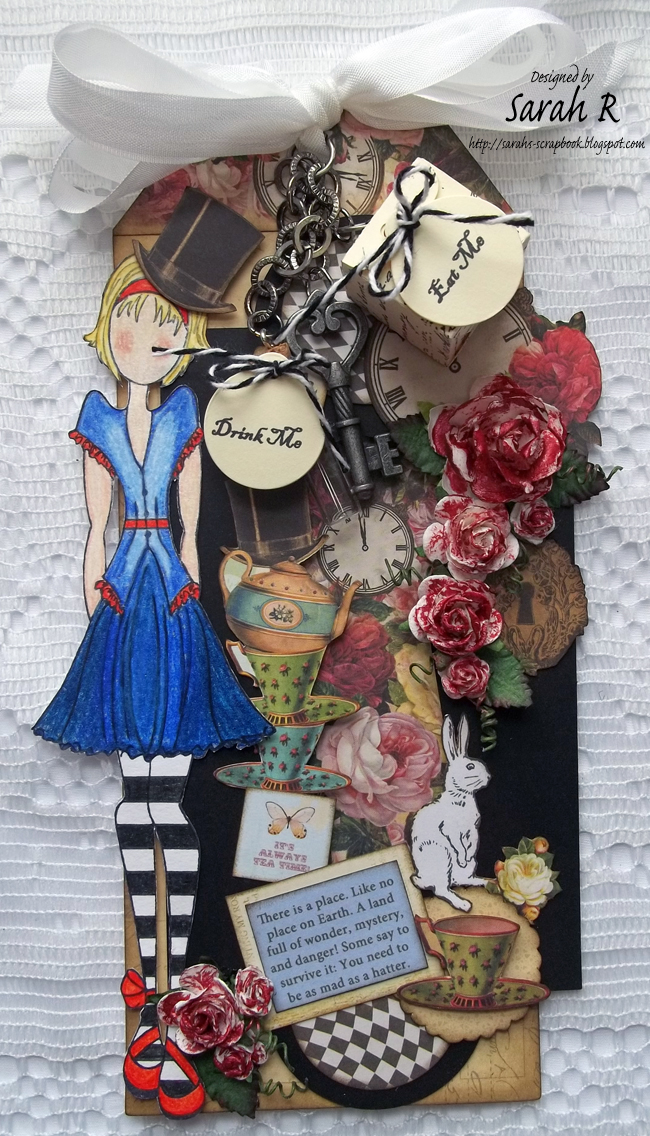
Unusual Alice - Julie Nutting Doll Tag
Memories - Mixed Media Layout
Swing - Mixed Media Layout
Today - Mixed Media Layout
Craft Arena 2 - Home Decor and DIY
Altered Jewelry Box
Victorian Christmas Advent Calendar
Craft Arena 3 - Mixed Media, Altered Projects and Jewelry
Ozymandias-Inspired Reverse Mixed Media Canvas
Dare to Spread Your Wings - Mixed Media Canvas
Art is the Answer - Mixed Media Altered Journal Cover
Clockwork Angel - Altered Dress Form
Craft Arena 4 - Bible Journaling, Planners and Journals
Alice in Wonderland - Art Journal Cover
Alice in Wonderland - Watercolor Art Journal Page
Alice in Wonderland - Mixed Media Art Journal Page (with Mica Powders)
Altered Book - Music Inspired Art Journal Cover
All You Need is Love - Music Inspired Mixed Media Art Journal Page
Wow, April was a busy month and I wasn't as creative as I would have liked! But I do have a set of ATCs to share with you inspired by L. Frank Baum's book The Wonderful Wizard of Oz. I made these for the March/April ATC swap at Scraps of Darkness/Scraps of Elegance and now that my partner has received them, I can share them with you! I just love the Oz stories - and I hope my swap partner does too!
First, we have the Scarecrow-inspired ATC. The background of Yellow Bricks was created with White Sand Texture Paste mixed with ColourArte Primary Elements in Golden Nugget. I layered a piece of rugged burlap and a patch of denim and added a twine 'belt' and the quote (matted on black cardstock).
Next is the Tin Man-inspired ATC. I used foil hardware tape which I scored and added 'rivets' to using my eyelet hole punch. I used Finnabair's Rust Effects texture paste along the seams/rivets. I made a heart out of air-dry clay and broke off and reattached one side of it. I painted it with ColourArte Silks Acrylic Glaze in Carmen and then added a generous coat of Ranger Crackle Accents.
Finally, we have the Cowardly Lion-inspired ATC. I painted the base with ColourArte Silks Acrylic Glaze in Forest Green - this made me think of the Emerald City - and then embossed the card with a Tim Holtz embossing folder. I cut the crown out of black cardstock twice using my Silhouette Machine and layered the two crowns with pop-dots in between. I roughly painted the top crown with ColourArte Silks Acrylic Glaze in Emperor's Gold and added a Liquid Pearl and two 'rubies'.
Thanks so much for stopping by my blog today - I hope you enjoyed this little visit to Oz. ;-)