Saturday, February 25, 2017

"Scorched Heart" Mixed Media 6x6 Canvas ~ Creative Embellishments

Today I'm sharing a mixed media canvas created for the Creative Embellishments Design Team! I'm calling this piece Scorched Heart.
I started out with a 6x6 canvas and used a Prima stencil and some Prima Art Extravagance White Crackle Texture Paste. Once the texture paste had dried, I added the a small tart tin that I had primed with Prima Art Basics Heavy White Gesso. Next, I started playing with colours to create the background - I've used Lindy's Stamp Gang February Colour Challenge Palette for this Canvas.
I used LSG Mists in Queen of Hearts Red, Pretty in Pink Pink and Dark Chocolate Truffle. I also used Prima Metallique Art Alchemy Gold Rush Acrylic Paint to add the gold-tone to the background and then inked the edges of the canvas with Distress Ink in Ground Espresso

Once I was happy with the back ground I added the altered Relics & Artifacts Flaming Heart on top of the Tart Tin. To alter the Relics and Artifacts Flaming Heart, I started by removing the jewelry rings from the two pieces and gluing them together. I painted the flames using Prima Metallique Art Alchemy Paints in Gold Rush, Fresh Orange and Rusty Red. I primed the heart with Prima Art Basics Heavy Black Gesso and then added a coat of Prima Art Extravagance Gold Crackle Texture Paste. Once the texture paste had dried, I sanded the heart to level out any bumpy areas and to add some extra distressing. Next, I painted the heart with a coat of Tim Holtz Distress Crackle Paint in Clear Rock Candy. Finally, when the clear crackle layer was dry, I misted the heart with the Queen of Hearts Red mist, allowing it to seep into the cracks and then wiped it off the surface. 
I used the smallest set of wings from the Fairy Wing Set 3 to add wings to the heart feature. I started off by embossing the wings with Lindy's Stamp Gang Embossing Powder in Golden Angel Wings and then adding some Vintage Gold Embossing Powder to the Wing Tips. The wings ended up being too light to suit the canvas, so I misted them with the Queen of Hearts Red mist and then added some Prima Metallique Art Alchemy Rusty Red Acrylic Paint to the Wings. I painted the wing tips with the Gold Rush paint and also lightly dry-brushed the gold over the red part of the wings.
To finish off the canvas, I added pieces cut from the Mini Quatrefoil 6x6 Panel. I inked the panel pieces with the Ground Espresso Distress Ink and then glued them to the frame. Wherever the panel pieces overlapped with the gold-tone in the background, I added some Prima Art Extravagance Gold Glitter using Ranger Crackle Accents. The glitter ended up being too . . . glittery. . . for the canvas so once it had dried, I painted over the glitter sections with the Gold Rush Paint to tone it down. I ended up loving the texture this gave to the gold sections of the panel!Thanks so much for visiting my blog today! Happy Crafting!


Saturday, February 11, 2017

Mon Amour Altered "LOVE" Letters ~ Creative Embellishments

Today, I'm sharing some Altered "LOVE" Letters with you! I found this set of letters at a local dollar store and knew I could turn them into something beautiful for Valentine's Day! I've used Graphic 45's Mon Amour paper collection along with Creative Embellishments Chipboard and Wood Veneers to embellish the letters! The letters can be arranged in a row horizontally or they can be stacked in a square!


I started by covering each of the letters with similar patterned paper in different colours from the Mon Amour 6x6 paper pad. I inked the edges of all the letters (and the fussy-cut elements) with Distress Ink in Black Soot - I love the contrast of the black with the red, pink and ivory in this collection!

On the 'L', I used a CE Chipboard Flourish 17, which I embossed with Stampendous Frantage Embossing Enamel in Aged Ivory. I also used one of the gorgeous CE Wood Veneer Hearts, which I embossed twice - first with a light pink embossing powder and then with an Antique Gold Embossing Powder that I used to highlight the details on the heart. To finish the embellishments, I added in a small Je t'aime sentiment cut from the 8x8 Mon Amour papers, some half-pearls and some small red roses.

On the 'O', I used the circular frame from the CE Heart Frame Set, also embossed with the Aged Ivory enamel. I also used another of the Wood Veneer Hearts (finished in the same way as the previous one) and the "Love" key from the Steampunk Heart 3 chipboard set - I embossed the key with the Antique Gold embossing powder. I framed an image from the Title Page of the 12x12 Mon Amour papers in the opening of the 'O'. I made a tiny envelope from the 6x6 paper for the square You are Loved sentiment, which I cut from the 8x8 paper. Again, I finished the embellishing with pearls and roses.

On the 'V', I used one of the corners from the Filigree Corner Set 1 and embossed it with the Aged Ivory enamel. Another tiny envelope and two square images cut from the 8x8 papers, as well as some more pearls and roses to finish off the 'V'.

Finally, on the 'E', I used another Flourish 17 (embossed in Aged Ivory enamel) and one of the chipboard Mini Frames (embossed with Antique Gold). I framed an image from the 12x12 papers using the mini-frame and then filled in the frame with Ranger Glossy Accents so that it would have the look of a locket. I added an Always & Forever banner (cut from the 8x8 papers) and a few small roses to finish off this letter.

Thanks so much for visiting my blog today! I hope you're celebrating Valentine's Day with someone you love on Feb. 14th!

Wednesday, February 1, 2017

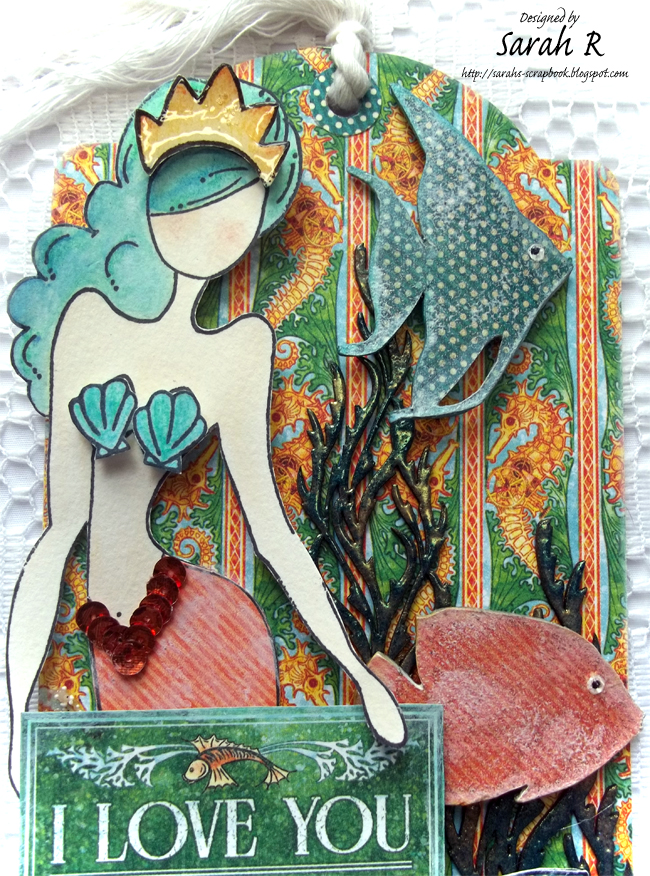
Voyage Beneath the Sea Mermaid Valentine Tag ~ Creative Embellishments February Challenge

I was inspired by this month's Creative Embellishments challenge photo to create a colourful Voyage Beneath the Sea Mermaid Valentine Tag. The twist on this month's challenge was to use paint - so I had some fun with Watercolours!

I stamped the mermaid and painted her with Watercolours and added some Graphic 45 Voyage Beneath the Sea paper to her tail. I created the scene using some Prima White Sand Texture Medium, Bronze Glitter and Prima Art Stones (regular and mini). I used Creative Embellishments Seashells and Seaweed 2, which I embossed with Lindy's Stamp Gang Embossing Powders. Then I lightly dry-brushed the seashells with white gesso to give them a weathered/under-the-sea look. I added two Creative Embellishments Tropical Fish to the scene as well. I covered the fish with paper from the Graphic 45 6x6 paper pad. Inked/Distressed them with Distress Ink and white gesso and then painted on the eyes. I painted them with some Prima 3D Gloss Gel Medium for some shine and added a dot of Glossy Accents for the fish eyes! 

Here are some different angles/close-ups so you can see all the details and dimension!


Hope you like my interpretation of this month's challenge - I can't wait to see what you create! Remember to follow the Rules for the Challenge so that you're eligible to win!

Challenge Rules:
  • Create a NEW project (i.e., layout, mini album, tag, card, canvas, etc…) as of February 1st 2017.
    • Please no back linking (meaning projects from previous months that may fit the challenge requirements). Please link only NEW projects.
  • Combining the CE Challenge with other challenges is permitted.
  • Please add your entry to the InLinkz box on the Challenge Post on the Creative Embellishments Blog to be eligible for the prize. You have until the last day of each month 11:55 pm eastern time to enter.
  • It is required that you mention in your blog post that you are playing along at Creative Embellishments together with a link back to our blog. Please make sure to reference our challenge. 
  • We would love to see you USE AT LEAST 1 OF CE products on your projects but it isn’t required to play along; however, everyone who does use CE product will get and extra chance at winning.
  • WINNERS will have 2 weeks to claim their prize. The winner will be announced on the CE blog post the day after the challenge ends.
Thanks so much for stopping by my blog!